Development of Problem-Man

As the games get larger and more advanced, the amount of topics I can cover without writing for days on end becomes more limited.
So this time, let's take a look at my implementation of the state machine for the ghosts, how I learned and utilized Godot resources, and how the game's story mode works.
A tribute
Before we get into it, let's talk about the game's theme. The game's theme was always clear to me from the beginning, and coincidentally also fit well into a game like Pac-Man. A tribute to the previous four games, with each maze being colored after the theme of said games, as well as some sound effects coming over to help with the oh so important nostalgia.
That totally will not add weeks of extra work!
— Me
Technical time!
Let's get to the point.
Please note that my understanding may not, and most likely is not, 100% correct.
Finite state machines
This was something I knew I had to learn after finishing Cheese Chasers. In that game, having the concept of a finite state machine for the player, would've made the code a lot cleaner, and development easier to comprehend.
In my understanding, a finite state machine is a list of states that a scene can be in, each state has its own code, properties, logic, and processing. There can be essentially an infinite amount of states, but because eventually you will wrap back to... let's say an "idle" state, it's finite. The states can communicate with their owner, but not with each other.
I learned how to implement this by following this amazing tutorial by GDQuest.
Here's a simple example of the state machine taken straight from Problem-Man:
class_name StateMachine
extends Node

@export var initial_state: State
@onready var _current_state: State = initial_state

func _ready() -> void:
    for state: State in get_children():
        assert(state is State, "All children must be states")
        state.finished.connect(transition_to_next_state)

    _current_state.enter()

# State machine executes the current state's processing functions
# like _physics_process, _process, _input, etc.
func _physics_process(delta: float) -> void:
    _current_state.physics_update(delta)

func transition_to_next_state(next_state: String, data := {}) -> void:
    _current_state.exit()
    _current_state = get_node(next_state)
    _current_state.enter(data)
As an example taken from Problem-Man, take the ghosts' two (out of four) possible states: "chase" and "scatter".
- In "chase" state, the ghost will chase the player directly.
- In "scatter" state, the ghost will move to its designated corner.
The ghosts start off in their "chase" state, each ghost has a different chase behavior, and we can define that in separate scripts per ghost instance. As a background timer hits, the game tells the ghosts to switch to "scatter" state. This can be done either by the owner, or the states themselves can indicate they are finished, run a clean-up function and also indicate which state to switch to next.
An example of the red ghost's scatter state:
extends GhostState

# The corner cell to move to
@onready var corner_cell: Vector2 = Ghost.CORNERS[Ghost.Corner.TopRight]

# Code to execute when state starts
func enter(_data := {}) -> void:
    var current_cell := NavigationManager.position_to_cell(ghost.position)
    var move_points := NavigationManager.get_move_points(current_cell, corner_cell)
    ghost.set_pathing(move_points)

func exit() -> void:
    ghost.reset_pathing()

func physics_update(_delta: float) -> void:
    ghost.navigate()
How were these useful?
I used them for the ghosts, as each ghost primarily has different behaviors based on which ghost they are.
- Red ghost chases the player directly.
- Pink ghost chases the player by targeting two positions ahead of the player.
- Orange ghost chases the player only when more than 8 positions away from the player.
- Blue ghost takes the distance from the red ghost to the player, doubles it, points in that direction from his own position, and moves to that target.
As you may already tell, defining this behavior for each ghost separately in a single script would become a nightmare, and I'm not even trying to think of doing that if I ever wanted to expand to five or more ghosts.
Godot resources
Creating multiple versions of the same maze sounded very tedious, surely a better approach exists? Preferably, I needed a system that could change a lot of things in the game, based on one singular variable, and make this as scalable and easy as possible.
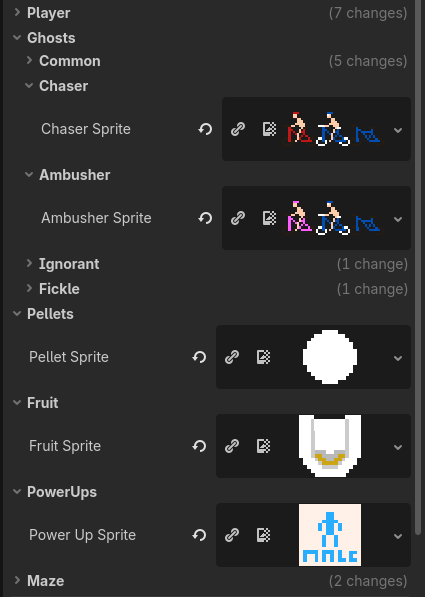
A resource is an object of data that can hold all kinds of different variables, properties, logic, ... and be applied to a scene. In my case, I made a "LevelResource" that held a lot of variables like the ghosts' sprites, the player's sprite, the maze's textures, sound effects, ... all kinds of stuff. By creating it from script, I can instantiate this script many times as a resource, and each resource then can have the properties assigned uniquely to what it needs to be.
For example, after creating the classic maze, I needed to replace this maze by the Tricat-themed maze without having to re-create everything from scratch, and without making it conditional inside the maze itself. By instantiating a LevelResource, I can assign the different textures, sound effects, ... to this resource, call it a TricatLevelResource, and use it wherever I need to.
Here's the LevelResource script:
class_name LevelResource
extends Resource

@export_group("Ghosts")
@export_subgroup("Common")
...

@export_subgroup("Chaser")
@export var chaser_sprite: Texture2D

@export_subgroup("Ambusher")
@export var ambusher_sprite: Texture2D

@export_subgroup("Ignorant")
@export var ignorant_sprite: Texture2D

@export_subgroup("Fickle")
@export var fickle_sprite: Texture2D

@export_group("Pellets")
@export var pellet_sprite: Texture2D

@export_group("Fruit")
@export var fruit_sprite: Texture2D

@export_group("PowerUps")
@export var power_up_sprite: Texture2D

@export_group("Maze")
...
Take a look at the instances in Godot's editor, these are all from the same LevelResource script:
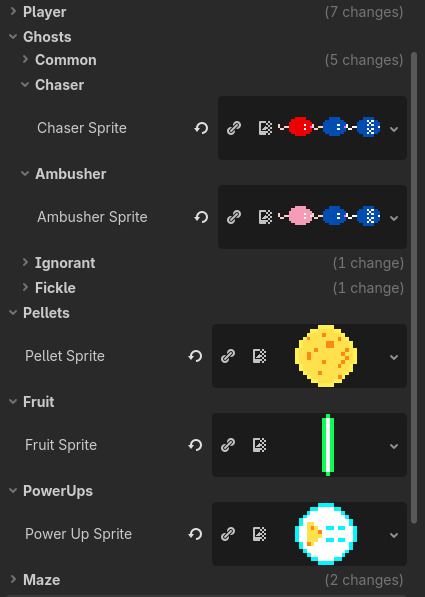 | 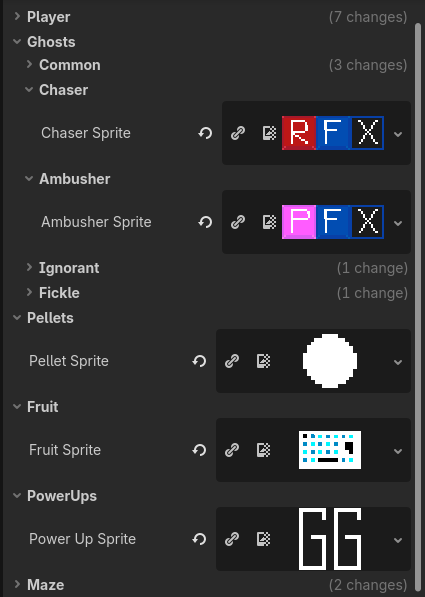 |  |
|---|---|---|
| Cheese Chasers Level Resource | Keybricks Level Resource | I need to go Level Resource |
Each of these represents a different instance of the same LevelResource script, with their own sprites, textures, and settings. Loading them in by path depending on which theme is currently active did all of the work for me. Through this system, creating the story mode was much easier than it could have been.
Here's a gif showcasing it changing in real-time, on command:
Story mode
The story mode system is actually quite simple. In the GameManager, I have a queue variable that holds the types of levels to play in sequence, this queue is an array that is populated by randomizing the types of level to play, and then simply plays the next one in queue when it's time for the next level. It loops until the player loses all lives.
I also keep which level type was played last, and which is being played now. This was used purely for the transition cut-scene between story levels.
Here's how the story mode starts:
const STORY_LEVEL_TYPES: Array[GameConfig.LevelType] = [
	GameConfig.LevelType.Tricat,
	GameConfig.LevelType.KeyBricks,
	GameConfig.LevelType.INeedToGo,
	GameConfig.LevelType.CheeseChasers,
]

func start_story() -> void:
	# Randomize level types
	level_type_queue = STORY_LEVEL_TYPES.duplicate()
	level_type_queue.shuffle()

	# Set previous to classic for transition
	previous_level_type = GameConfig.LevelType.Classic

	# Take first level type, transition
	var first_level_type: GameConfig.LevelType = level_type_queue[0]
	current_level_type = first_level_type
	main.load_scene(Main.Scene.Transition)
And here's how the next level picks the next level type:
func next_level() -> void:
	current_level += 1

	# If queue empty, we're in classic.
	if level_type_queue.size() == 0:
		main.load_scene(Main.Scene.Game)
		return

	assert(level_type_queue.size() > 1, "Queue has less than 1 level type, this should not happen.")

	# If queue has more than 1 level type, pop front, push back
	# Set new first element in array to current level type
	var old_level: GameConfig.LevelType = level_type_queue.pop_front()
	previous_level_type = old_level
	level_type_queue.push_back(old_level)
	current_level_type = level_type_queue[0]
	main.load_scene(Main.Scene.Transition)
A* Pathfinding
For the ghosts to navigate the maze, I used the A* pathfinding algorithm by following an excellent tutorial by YouTuber Mina Pêcheux. She explains very well how A* pathfinding works, when to use it, and how to implement a basic version of it in Godot.
What is A* pathfinding?
A* pathfinding is a way to find the shortest path between two points in a graph. It's a very efficient way to find the shortest path, and it's often used in games to navigate characters through a maze. Godot makes this quite easy to implement by providing a built-in AStarGrid2D class.
This class enables us to easily create a navigation grid, and it was perfect for a system like the ghosts navigating the maze. In my understanding, it works by indicating a region based on a grid, and then calculating the move points to make from one cell to the next.
Furthermore, we can make it even easier by combining this with a TileMapLayer, and defining which tiles are meant to be walls or not. TileMapLayers simply draw the textures in tiles, each tile can have data on it. In the AStarGrid2D, we check for each tile, and if the tile has "is_wall" set to true, we set the tile as solid in the grid.
Implementation of A* pathfinding
I could never explain it as well as Pêcheux does, so make sure to watch her video if you're interested in this topic.
Here's a code snippet of how it is used in Problem-Man:
const REGION := Rect2i(0, 0, 28, 29)
const CELL_SIZE := Vector2i(16, 16)

var grid := AStarGrid2D.new()

func _ready() -> void:
    # The region of the grid, in rows and columns.
    grid.region = REGION

    # The size of each cell in the grid.
    grid.cell_size = CELL_SIZE

    # Grid's offset for centering the move points.
    grid.offset = CELL_SIZE * 0.5

    # Disable diagonal movement.
    grid.diagonal_mode = AStarGrid2D.DIAGONAL_MODE_NEVER

    # Set the default heuristic to only use 4-side movements.
    # https://docs.godotengine.org/en/stable/classes/class_astargrid2d.html#enumerations
    grid.default_compute_heuristic = AStarGrid2D.HEURISTIC_MANHATTAN
    grid.default_estimate_heuristic = AStarGrid2D.HEURISTIC_MANHATTAN
    grid.update()

# Combine the AStarGrid2D navigation with our maze's tilemap.
func setup(maze: Maze) -> void:
    for cell_position in maze.get_used_cells():
        if not REGION.has_point(cell_position):
            continue

        var data := maze.get_cell_tile_data(cell_position)
        if data and data.get_custom_data("is_wall"):
            grid.set_point_solid(cell_position)

func get_move_points(start_position: Vector2, end_position: Vector2) -> PackedVector2Array:
    # Clamp the movement just in case
    var max_point := Vector2(REGION.size) - Vector2.ONE
    var start_clamped := start_position.clamp(Vector2.ZERO, max_point)
    var end_clamped := end_position.clamp(Vector2.ZERO, max_point)

    # Request the path from the grid, returns an array of Vector2s.
    var result = grid.get_point_path(start_clamped, end_clamped, true) as Array[Vector2]
    return result
Take a look at the ghosts' navigation constantly updating while chasing the player:
Future
It's looking bright! I've officially reached the halfway point of the Problem 18 challenge, and I'm very proud of what I have achieved so far. Everything that I have learned, developed, and put out there into the world of indie game development. I'm looking forward to the next five, and significantly more challenging games!
I'm going to continue learning, publicizing, blogging, and sharing my journey with you.
The next game is a Super Mario Bros clone, I have already got some ideas for it. The name will be "Snack Chads", and it'll portray an actual part of my daily routine, my snack walks! You'll find out what they are in time. 😉
Lessons learned
The biggest non-technical lesson I immediately took away is how much time needs to be spent to actually test the game. I mean sure, we can just test as we develop, but the bigger the game becomes, the more possible it is for bugs to sneak in. Especially into previously working parts of the game and its code.
A small technical recap:
- Finite state machines
- Godot resources
- TileMapLayers
- A* pathfinding
Furthermore, I learned that sound effects are still far from my specialty, and I'll try to put more time and effort into them for Snack Chads.
Problem-Man was undeniably a big step forward, a lot of new concepts have been learned, attempted, and implemented. My skills in these necessary concepts are growing, and it feels good to know that I can create arcade games that actually are fun to play.
Give Problem-Man a try on itch.io and let me know what you think!
As always, I sincerely hope my journey can bring you some value on your own.
Thanks for reading! ❤️
I want to read more!
It'd be my honor.
- Problem-Man released!: Problem-Man's release announcement.
- Development of "Cheese Chasers": Take an in-depth look into the development of Cheese Chasers.
- Cheese Chasers released!: Give Cheese Chasers a try!